How to configure Auto RMA from Shopify to NetSuite using Robust NetSuite Integrator
If you are looking forward in configuring the Return management from Shopify to NetSuite , you can opt for the Auto RMA functionality of Robust NetSuite Integrator
Step 1
Log in to your Shopify store and open our Robust NetSuite Integrator app from the Apps section, further click to the Configuration Page > App Settings > Enable toggle for Enable Auto RMA Management
a, further hit the Save button. Below is a screenshot to help you understand this visually.
Step 2
Click on Click here to get Order Return Form , you will be directed to the detailed form where the order return related information needs to be filled so that it can be synced to Oracle NetSuite .
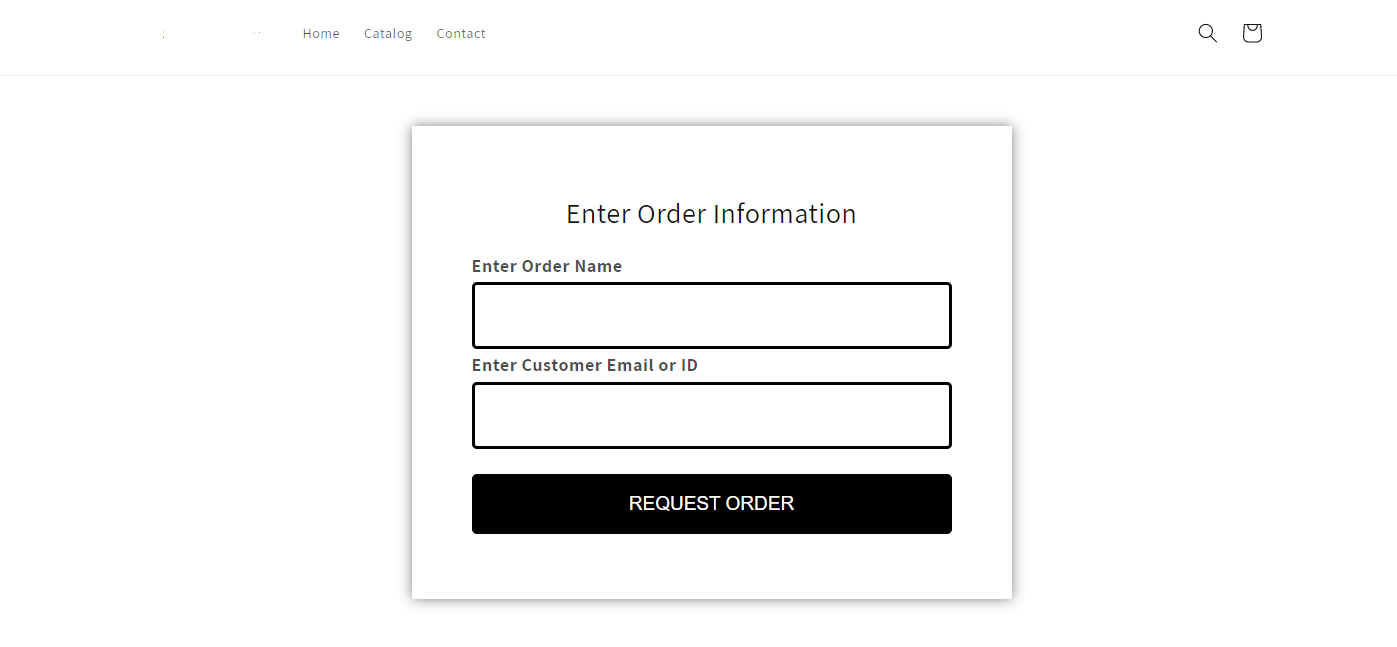
Step 3
Input the details required to get into the Line items of the respective order. Enter the Order Name and Customer Email or ID. Once done it will direct to another window where you will be selecting the items related to the specific order input in the order return form . Once your will input the details , can click on Request Return.
Step 4
Once the Request is Submitted on NetSuite . The Return Authorization can be send as highlighted in the below screenshot
Step 5
Now , after this click on the Approve Return button to initiate the refunds in NetSuite.
Once Return Authorization is approved , click on Receive
Step 6
Once we click on Receive , we will receive the Item fulfilment
As suggested in the below screenshot , you can check the Return Authorization by click on the link highlighted.
The below screenshot shows how the Refund Authorization is created in NetSuite
Note : To initiate the refund , please make sure to add the Return Authorization ID along with the Transaction body field in the configuration page . Click here
In case, you have any questions OR suggestions, feel free to reach out to us at help@webbeeglobal.com.
Related Articles
Robust NetSuite Integrator: Complete Feature List
Complete Feature List This below table shows the compatibility of our integrator with all Shopify & Oracle NetSuite plans. Oracle NetSuite Editions Shopify Plans Robust NetSuite Integrator Support NetSuite NetSuite One World NetSuite CRM NetSuite ...Robust NetSuite Integrator app: Configuration Page Overview
Our configuration page contains 3 sections: NetSuite Settings App Settings Point of Sale Settings NetSuite Settings The section holds mandatory credentials such as Account ID, Consumer Key, Consumer Secret, Token ID, and Token Secret that our app ...How to map your Shopify currencies with your NetSuite currencies using Robust NetSuite integrator?
If you are interested in mapping your Shopify currencies with your NetSuite currencies, please follow these below-mentioned steps. Step 1: Open your NetSuite account, and from the top-navigation pane, hover over to the Setup > Company > Enable ...How to sync Shopify fulfillment from Shopify to NetSuite using the Robust NetSuite Integrator?
If you are doing your fulfillments via your Shopify store directly, further, wants to create its fulfillment record inside a NetSuite transaction, this is the setting you should configure inside the Robust NetSuite Integrator. Step 1 Open your ...How to configure a Customer Deposit record in your NetSuite account of your Shopify customer using Robust NetSuite Integrator?
Step 1: Inside NetSuite, from the top navigation pane, please go to the Customization > Forms > Transaction Forms. Below is a screenshot to help you understand this visually. Step 2: COPY the internal ID. Below is a screenshot to help you understand ...