Inventory Update from Amazon FBA active products to Shopify Products via Amazon MCF by WebBee APP
1. Multiple Amazon Seller Accounts
Connect your Amazon Seller account to the WebBee app:
Authorize and connect each Amazon Seller account (e.g., Amazon FBA US, Amazon FBA INDIA, Amazon FBA JP).
Once connected, these accounts will be visible in the WebBee app.
2. Ensure Unique SKUs for Shopify Products
Could you start by verifying that each Shopify product has a unique SKU?
If the SKU is not unique, assign a unique SKU to the product.
3. Create Shopify Locations
Navigate to Shopify Admin > Settings > Locations.
Create a separate location in Shopify for each Amazon Seller account.
Name the locations accordingly:
Example: For Amazon FBA US, name the Shopify location "Amazon FBA US" and ensure the country is set to "USA" in it.
If you have connected to other Amazon Marketplaces in the WebBee app, then create more locations for these marketplaces and ensure the country is set up as per the Amazon Marketplace.
Example: For Amazon FBA Canada, create a Shopify location for Amazon FBA CA and ensure the country is set to Canada.
Assign these Shopify locations to the relevant Shopify products.
Note: Once locations are created, do not manually edit inventory numbers in these Shopify locations, as the WebBee app manages inventory updates.
4. Map SKUs in the WebBee App
Open the WebBee app > SKU mapping page section and click on Sync Item Manually.
The Shopify SKU will appear. Check if the Amazon FBA SKU is mapped:
If not, retrieve the product SKU from the Amazon Seller account.
Paste the SKU by clicking 'Update.'
Note: Avoid mapping ASIN or FNSKU in this process; only use the SKU.
If multiple Amazon marketplaces are added (e.g., Amazon FBA US, Amazon FBA INDIA):
Repeat the above steps for each marketplace.
In SKU Mapping from "Accounts," from the drop-down, select the Amazon FBA market, and then repeat the above mapping process.
5. Configure Inventory Sync Settings
 Additional Marketplace Settings
In the WebBee App > Configuration > scroll down to Amazon MCF Marketplace Settings and select the relevant Amazon marketplace (e.g., US).
Click on [+] Show Additional Settings (Including Inventory Sync Settings).
Locate the setting Shopify Location to Use for Inventory Update and map the appropriate Shopify location:
For Amazon FBA US, select the "Amazon FBA US" location you have created in your Shopify.
Repeat this for other marketplaces, ensuring that each location is mapped correctly.
Required: Do not assign the same Shopify location to multiple Amazon marketplaces. For example, "Amazon FBA US" should only be mapped to the US marketplace, not Amazon FBA INDIA.
6. Enable Inventory Sync
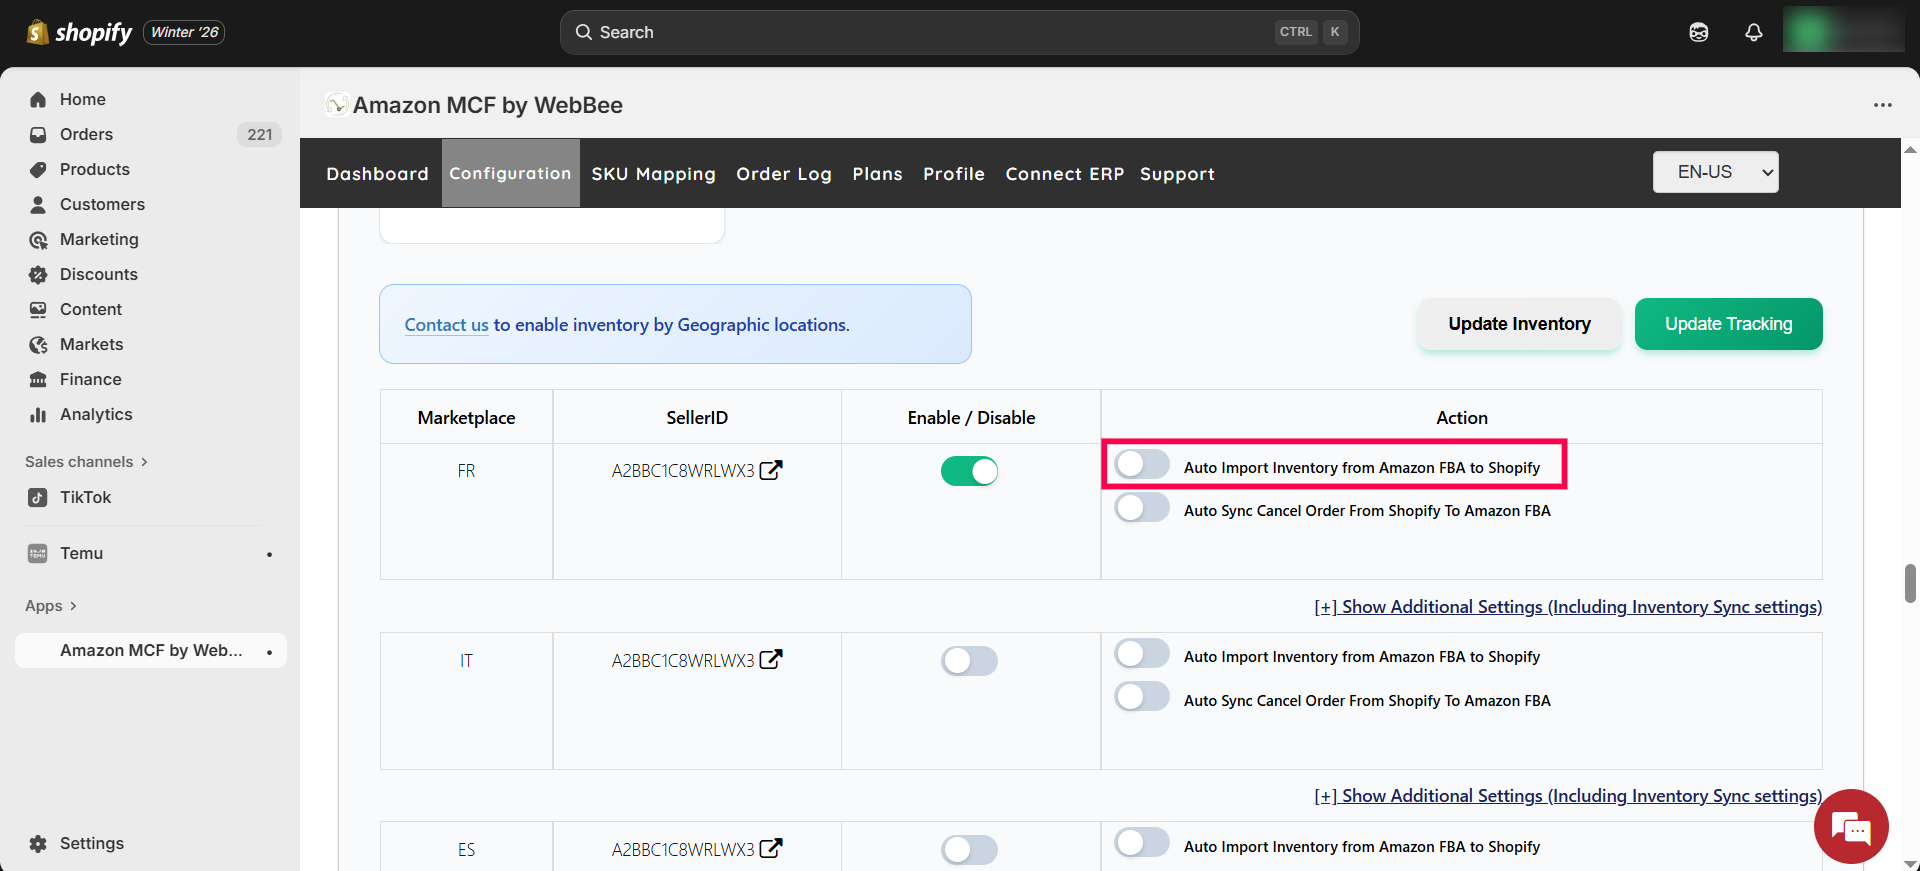 Inventory Sync Toggle
Ensure Auto Import Inventory from Amazon FBA to Shopify is enabled for each Amazon marketplace.
Optionally, click on Update Inventory:
The inventory sync is already in process if the button is greyed out.
Note: Inventory sync runs automatically every 30 minutes.
7. Additional Features and Notes
7.1 Out-of-Stock Quantity Buffer on Amazon
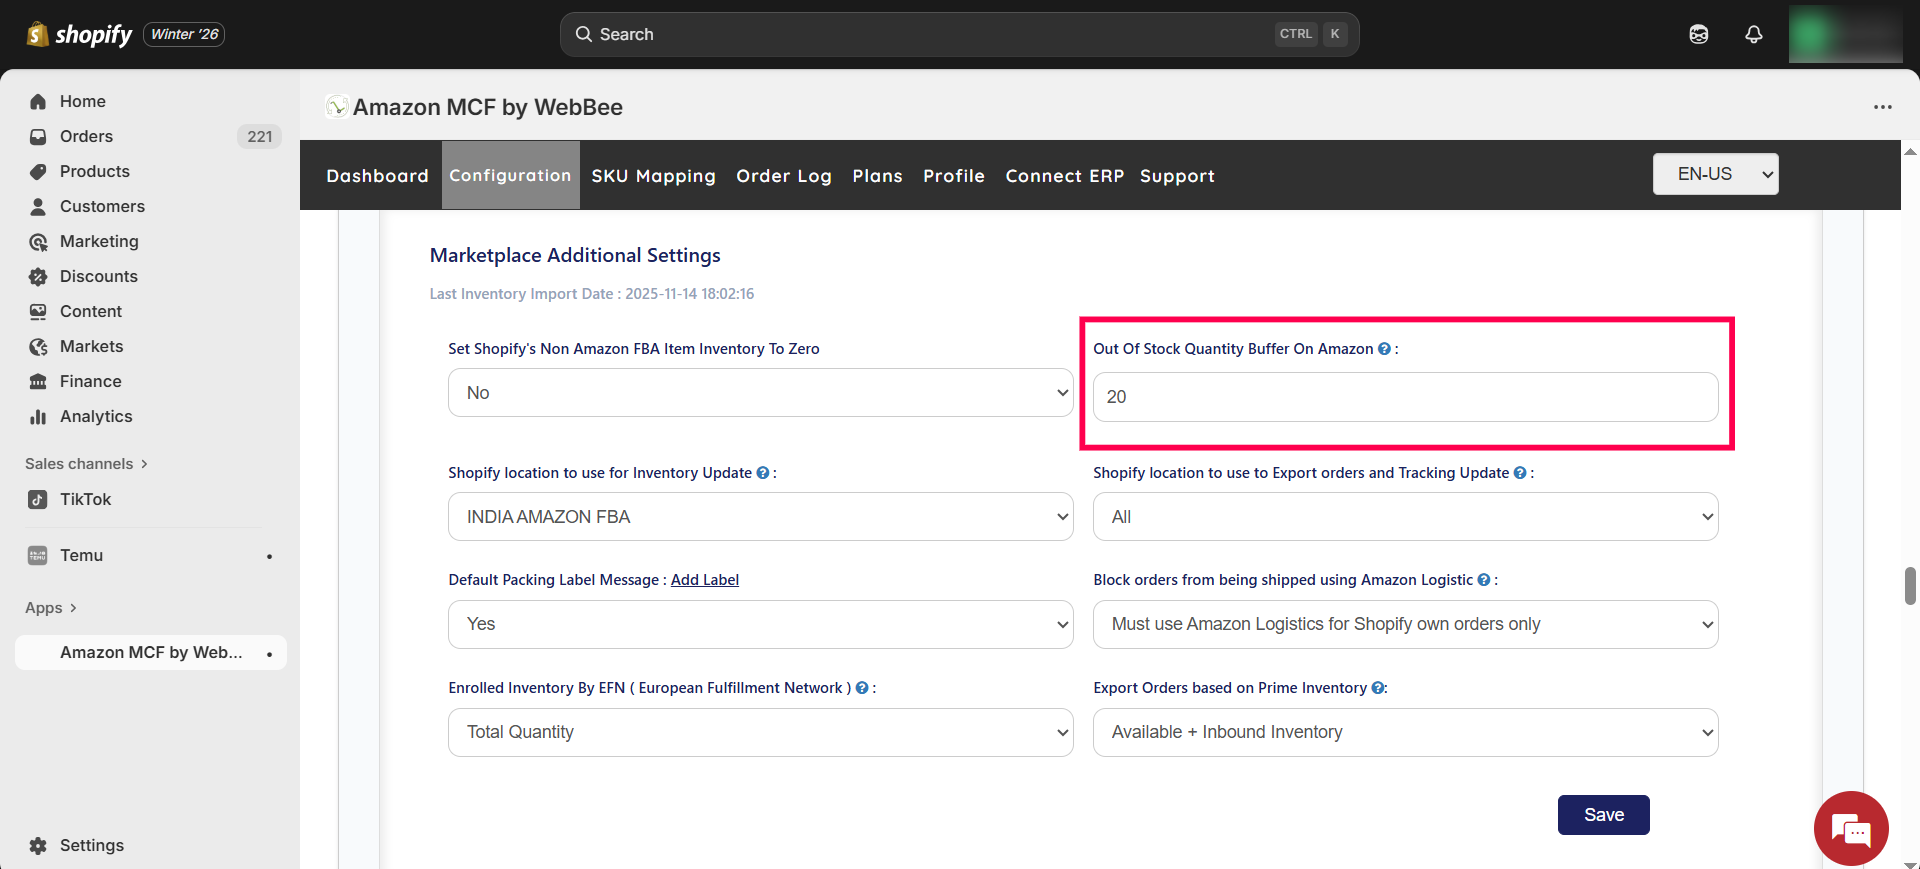 Out-of-Stock Quantity Buffer
If the client uses the Out of Stock Quantity Buffer on Amazon, the WebBee app will deduct the buffer quantity and Sync the remaining inventory to Shopify.
Example: If a Shopify product, also an FBA product, has an inventory of 100 in Amazon FBA and the buffer is set to 20, the WebBee app will sync 80 to Shopify.
If the inventory in Amazon FBA for the product reaches 20 or fewer, the WebBee app will update the inventory as 0 in Shopify to maintain the buffer on Amazon Seller.
7.2 Export Shopify Orders as Blank Box Orders to Amazon FBA
 Blank Box Settings
If the client has selected Must Use Blank Box for All Orders, the WebBee app will update the inventory of blank box orders only, regardless of the product inventory in Amazon FBA.
7.3 SKU-Level Quantity Buffer
 Amazon Buffer Quantity
You can set a quantity buffer at the SKU level:
Go to WebBee App > SKU Mapping > Select Account > Search SKU > Action > Update > Amazon Buffer Quantity.
Enter the buffer quantity for the SKU. The WebBee app will deduct this buffer and sync the remaining inventory for the specific product.
7.4 Enable Virtual Bundle
 Virtual Bundle
 Add New Bundle SKU
If the client enables this feature and creates a virtual bundle using an Amazon SKU linked to more than one Shopify product, the WebBee app will divide the inventory accordingly among the Shopify products, affecting the inventory numbers for these Bundle Products Only.
By following these steps, inventory updates are effectively made, and potential issues are avoided with stock discrepancies.
Related Articles
Why my products inventory/ stocks not syncing from Amazon to Shopify via Amazon MCF by WebBee?
If the inventory does not sync back to Shopify from the Amazon seller. Possible reasons for the inventory not syncing correctly from the Amazon seller to Shopify products include the following reasons: 1. Inventory sync toggle is off: Solution: This ...How can you do SKU Mapping between Amazon MCF and TikTok Shop?
SKU stands for unique product identity, and it is assigned to products that are listed on various e-commerce platforms. You can access your inventory data in real-time across all channels by mapping your SKUs from Amazon MCF to TikTok Shop. If you ...Amazon MCF app by WebBee V/S Shopify's default Amazon FBA Integration
Features Auto Multi-Channel Fulfillment by WebBee Shopify's default Native FBA integration Supported (Fulfillment by Amazon) FBA marketplaces U.S., Canada, Mexico, Brazil, France, Germany, India, UAE, Italy, Spain, U.K., Egypt, Netherlands, Saudi ...Shopify: Amazon MCF by WebBee App - Complete Feature List
Complete Feature List This below table shows the compatibility of the Amazon MCF app by WebBee with all Shopify plans. Amazon MCF app Plans Shopify Plans Support Trial Starter Professional Plus Enterprise Starter Basic Shopify Advanced Shopify Plus ...TikTok & Amazon Integration via Amazon MCF by WebBee app: How to add Amazon FBA marketplace in our app?
How do we add the Amazon FBA marketplace to our app? Open the AMCF TikTok app > Click on Configuration Page > Go to Marketplace Settings. (Please ensure prior to that you are logged-in to your Amazon seller account as an admin user.) 1. Click on ...