How to list NetSuite products in Shopify?
If you are interested in (listing/syncing) all your NetSuite products in your Shopify store with all their available details, then follow these below-mentioned steps.
Step 1:
Inside the Robust NetSuite Integrator app, please go to the Configuration Page > App Settings > and scroll down to this "List Product from NetSuite to Shopify" toggle, and turn it on.
Step 2:
Inside NetSuite, from the top navigation pane, please go to Customization > Lists, Records, & Fields > Item Fields and click on the New button. Below is a screenshot to help you understand this visually.
Step 3:
Follow, the steps displayed in the below image.
Note:
This should be done twice i.e. for two fields. 1) To list products on Shopify 2) To delete products from Shopify.
SAVE these two newly created NetSuite field IDs i.e. Field ID to list products on Shopify, and Field ID to delete products from Shopify.
Step 4:
Inside the Robust NetSuite Integrator app, please go to the Configuration Page > App Settings > and scroll down to this "NetSuite Product Import" section.
NetSuite Field ID to identify active products on Shopify:
Here, enter a NetSuite Field ID from Step 3 that represents "List products on Shopify".( It can be isonline which can be allowed as a standard field to list the active products which should always be TRUE
Temporary field to save Shopify Product ID:
Here, enter a NetSuite Field ID at which you want to see a newly created Shopify product ID i.e. 123456789. By default, it will be FALSE, in case if TRUE we will list the item back to Shopify
Here, enter a NetSuite Field ID at which you want to see a newly created Shopify product ID i.e. 123456789. By default, it will be FALSE, in case if TRUE we will list the item back to Shopify
NetSuite Field ID to identify products to delete from Shopify:
Here, enter a NetSuite Field ID from Step 3 that represents "Delete products on Shopify".
Note: To test the functionality, we have a provision to list some specific products at a time and then once done, can be continued listing all the products to Shopify
Below is a screenshot to help you understand this visually.
Note : The Product Title is a mandatory field here, rest of other fields are optional. You should make sure to hit the SAVE button one the fields are been entered as per context written below the fields .
You can add multiple variants , but as per Shopify's limitation can only add product and list with three options
Step 5:
To configure product fields mapping. Click on the Configure Product Mapping button. Below is a screenshot to help you understand this visually.
Once the button is clicked, you will see this below-displayed pop-up.

Note : The Product Title is a mandatory field here , rest other fields are optional . You should make sure to hit the SAVE button one the fields are been entered as per context written below the fields .
You can add multiple variants , but as per Shopify's limitation can only add product and list with three options
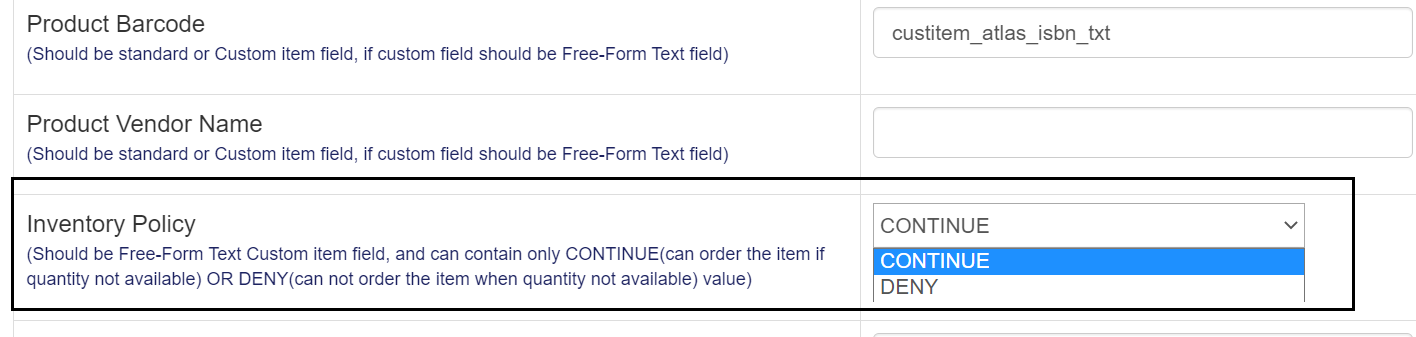
CONTINUE - If you allow the back orders DENY- If you wish to Remove/ delete
Note : The Product Title is a mandatory field here , rest other fields are optional . You should make sure to hit the SAVE button one the fields are been entered as per context written below the fields .
You can add multiple variants , but as per Shopify's limitation can only add product and list with three options
CONTINUE - If you allow the back orders DENY- If you wish to Remove/ delete
To configure meta fields mapping. Click on the Configure Product Meta Field Mapping button. Below is a screenshot to help you understand this visually.
Important notes:
All of these above-mentioned fields support both standard & custom NetSuite field IDs. Also, please make sure to save the changes before leaving the configuration page.
If you are going to use this feature, before updating any item in NetSuite, please be careful with parent & child relationship items. For instance: If the parent item P1 has 2 child items (variants) called A&B in Shopify and the parent item P2 has 1 child item (variants) called C in Shopify.
Then, in that case, if you want to update variant C under the parent item P1 in Shopify then firstly you need to de-list variant C by selecting the delete checkbox from NetSuite. Once it is deleted from Shopify then re-list the variant C by selecting the update checkbox from NetSuite.
Then, in that case, if you want to update variant C under the parent item P1 in Shopify then firstly you need to de-list variant C by selecting the delete checkbox from NetSuite. Once it is deleted from Shopify then re-list the variant C by selecting the update checkbox from NetSuite.
If you want to delete parent item including variants from Shopify then you need to Select the checkbox of Delete custom field of that parent item only from NetSuite. This will not only delete the parent item but also its variant items from Shopify.
If you want to delete single variant of parent item from Shopify then you need to Select the checkbox of Delete custom field of that variant item only from NetSuite. Once the variant item gets deleted, it will also delete the parent item from Shopify too.
Each product can have a maximum of three options and a maximum of 100 variants. e.g. If the product has 200 variants then it will list only hundred variants on Shopify due to restriction from Shopify.
While listing products from NetSuite to Shopify, Missing items with Reason are logged in the CSV file which can be downloaded from configuration (only a week old log will be available for download).
This feature is available as a part of our Max Unlimited monthly plan or you can subscribe from the plans page of the application
In case, you have any questions OR suggestions, feel free to reach out to us at help@webbeeglobal.com.
Related Articles
Robust NetSuite Integrator: Complete Feature List
Complete Feature List This below table shows the compatibility of our integrator with all Shopify & Oracle NetSuite plans. Oracle NetSuite Editions Shopify Plans Robust NetSuite Integrator Support NetSuite NetSuite One World NetSuite CRM NetSuite ...How to sync custom price from NetSuite back to Shopify via Robust NetSuite Integrator ?
If you want to sync the NetSuite price levels as a sale OR compare at price to your Shopify products using a Custom field in NetSuite rather than the standard price levels then follow these below-mentioned steps. Steps: How to create custom field in ...Robust NetSuite Integrator app: Configuration Page Overview
Our configuration page contains 3 sections: NetSuite Settings App Settings Point of Sale Settings NetSuite Settings The section holds mandatory credentials such as Account ID, Consumer Key, Consumer Secret, Token ID, and Token Secret that our app ...Robust NetSuite Integrator app - Understanding the Order Statuses
If you want to understand order statuses inside the Robust NetSuite Integrator, read this article and learn about all the order statuses in detail. 1. Overview of Order Statuses There are several statuses for orders, including pending orders, delayed ...Robust NetSuite Integrator: NetSuite item types we manage through our integration
The Inventory feature lets you track and manage the items and services your company buys and sells. Item records track a wide range of information in your account, including physical inventory, and more. Our application always track the available ...